Realtime Chat App — Flutter, Node.js & Socket.io
Realtime Chat App — Flutter, Node.js & Socket.io
In this blog we will see how to make a realtime chat app using Node.js as the backend and Flutter as the frontend. We will use sockets to communicate between devices.
Prerequisites
The following should be installed and running in your PC.
- Node.js : https://nodejs.org/en/download/
- Flutter : https://flutter.dev/docs/get-started/install
- Heroku CLI : https://devcenter.heroku.com/articles/heroku-cli
- git : https://git-scm.com/downloads
Nodejs (Server-Side)
Create a folder named real_chat_node and open it in the terminal. Then run the following command:
\real_chat_node> **npm init**</span>
Accept the defaults by pressing Enter. Next install the required packages through npm,which is available by default when you install node.
\real_chat_node> **npm install express**
\real_chat_node> **npm install** **nodemon** \real_chat_node> **npm install http** \real_chat_node> **npm install socket.io**</span>
Open the folder with your favourite IDE. Then go to package.json and in scripts add a dev key.


Next create a index.js file in your root directory. Write the following code in it.
const app = require('express')()
const http = require('http').createServer(app)</span> <span id="b29c" class="em ka iy dp kb b kc ki kj kk kl km ke s kf">app.get('/', (req, res) => {
   res.send("Node Server is running. Yay!!")
})</span><span id="5be0" class="em ka iy dp kb b kc ki kj kk kl km ke s kf">http.listen(8080)</span>
On your terminal type the following command:
\real_chat_node> **npm run dev**</span>
Leave it running and go to http://localhost:8080and you will get the message.
Now lets add socket in our nodejs app.
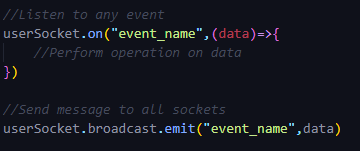
The connection event is triggered whenever a socket is connected to our app. We then add a listener to the send_message event which forwards any data that is sent to it to receive_message event.
Voila!! Our backend is ready. Let’s deploy it to heroku and then we can start our Flutter app.
Quick Note: The following are the ways to send and listen on events.

Heroku (Deployment)
Heroku is a cloud platform which will deploy our app so that we can access it from anywhere though a url. Let’s get started.
Before we deploy our app, we just need to make few changes.
- In index.js file replace port 8080 with process.env.PORT.
http.listen(process.env.PORT)</span>
2. Create a file named Procfile in the root directory and write the following in it.
web: node index.js</span>
3. Also create a .gitignore file and add the folowing
/node_modules</span>


Added .gitignore and Procfile
4. Next open the root directory in your terminal and setup heroku cli
\real_chat_node> **heroku login**</span>
You will be asked to login in. Enter your credentials and you are good to go.
5. Now create your heroku app
\real_chat_node> **heroku create <your-app-name-here>**</span>
6. Now initialize git and commit everything to heroku master.
\real_chat_node> **git init**
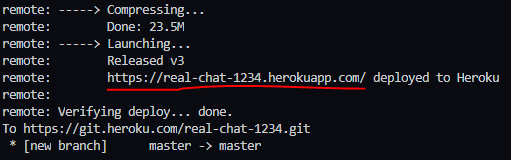
\real_chat_node> **git add .** \real_chat_node> **git commit -m "Initial Commit"** \real_chat_node> **git push heroku master**</span>
Wait for it to finish and done. You can go to the url generated to see the same message as earlier.
Note: Use your own url that will be generated.

We will use the url for connecting in our flutter app.
Flutter (Client-Side)
So our backend part is complete and now its time to start making our chat app in Flutter.
Open your terminal and type in the following command to create our flutter app.
flutter create --androidx real_chat_flutter</span>
After the project is created open the folder in your IDE.
In your pubspec.yaml file add the following dependency
dependencies:
  flutter:
    sdk: flutter
  cupertino_icons: ^0.1.2
  **flutter_socket_io: ^0.6.0**  _//Add this dependency_</span>
Open the main.dart in the lib folder and delete all the code and add the following code:
Now we have to create the ChatPage. Create ChatPage.dart file inside lib folder. Lets write the code for our Chat Page.
Now run the app in two devices and chat back and forth 😄.
What’s next? Now that the working is implemented, try to create a nice UI for the app. Also don’t forget that you can send more values in JSON data. So try sending username and the message as JSON data and display them accordingly. Check out my next article for one-to-one chat using socket.io.
If you face any problem, you can check out my github repo :
[## ibtesam123/real_chat_flutter
A new Flutter project. This project is a starting point for a Flutter application. A few resources to get you started…
github.com](https://github.com/ibtesam123/real_chat_flutter) [## ibtesam123/real_chat_node
Contribute to ibtesam123/real_chat_node development by creating an account on GitHub.
github.com](https://github.com/ibtesam123/real_chat_node)
Don’t forget to star ⭐ the repo and give claps 👏 if you liked the article. If you have any queries you can ask in comments. Thank you 😄
[## Flutter Community